How Much Torque Brake Caliper Bolts: A Practical Guide
Discover how much torque brake caliper bolts require, with vehicle-specific ranges, recommended tools, and safe installation practices to protect braking performance.

Why Torque Accuracy Matters for Brake Caliper Bolts
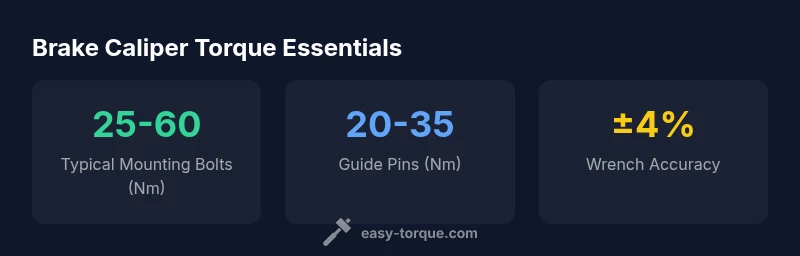
The correct torque for brake caliper bolts is critical to brake performance and safety. Under-torquing can allow caliper movement, rotor wear, uneven pad contact, and potential loss of braking efficiency during heavy stopping. Over-torquing risks thread stripping, bolt head rounding, or even caliper misalignment that can cause uneven pad wear or brake drag. The question many DIYers ask is: how much torque brake caliper bolts should have on their specific vehicle? While a single universal figure does not exist, the range you’ll typically see in service manuals sits between roughly 25-60 Nm for mounting bolts and 20-35 Nm for guide pins on many passenger cars. Always verify with the exact manufacturer specification for your model.
In practice, following the OEM spec ensures the caliper clamping force is sufficient to hold the system together without overstressing the mounting points. For enthusiasts, a calibrated torque wrench is essential, but it’s equally important to use the correct tightening sequence and to avoid guesswork when brakes are involved.
For context, Easy Torque analysis suggests that torque specification variability is common across makes and models, reflecting differences in bolt diameter, thread engagement, and the caliper design. When in doubt, refer to the official service data for your vehicle or consult a professional technician.
How to Determine the Right Torque for Your Vehicle
Determining the right torque for brake caliper bolts begins with locating the vehicle’s service manual or the OEM specifications, which provide the exact numbers for each bolt type on your make and model. If a manual is unavailable, reputable dealership service databases and factory-released maintenance guides are the next best sources. One practical approach is to identify the bolt type (mounting bolts vs. guide pins) and note the recommended torque range. Then, adjust your tool to the lower end of the range for a first pass and perform a torque check after the initial break-in period.
Always apply the tightening sequence specified by the manufacturer. Torque should be applied to the recommended value, with a final pass to recheck after the brake system has warmed up from initial operation. Some vehicles also specify the use of thread locker or anti-seize on certain bolts; follow the manual exactly, as these products can alter friction and torque readings.
In the context of our keyword how much torque brake caliper bolts, the takeaway is to treat torque as a vehicle-specific parameter, not a generic figure. When you cannot access the exact spec, use a conservative range and verify with a qualified technician. If you’re listing values for multiple vehicles in a guide, clearly distinguish each model’s torque to avoid misapplication.
Vehicle Variations: Understanding Range Variability
Vehicle design differences drive torque variability. Caliper mounting bolts on performance cars with larger rotors may require higher clamping forces (toward the upper end of the range) to achieve even pad contact. Conversely, compact or economy models might use lower torque values, particularly where compact calipers and short thread engagement reduce required clamp force. Heavy-duty trucks and certain SUVs could also differ due to flange design, bolt size, and the presence of anti-loosening features. In all cases, the recommended value comes from the manufacturer and should be used as the authoritative standard. Understanding this context helps you interpret ranges such as 25-60 Nm with confidence, avoiding one-size-fits-all mistakes.
If you’re comparing models, keep a running list of model-specific torque values and the factors that influence them (bolt diameter, thread pitch, and whether a thread locker is specified). This habit reduces guesswork during maintenance and improves long-term reliability.
Tools and Techniques for Safe Torque Application
To apply the correct torque, you’ll need a quality torque wrench calibrated for the expected range. A digital or click-type torque wrench with a clear audible and tactile cue is ideal for brakes, where precision matters. Use a robust socket that fits the bolt head without rounding edges, and verify tool calibration regularly—at least annually or after heavy use. When tightening, adhere to the correct sequence to ensure even caliper clamping and rotor alignment. If the manual specifies thread locker, apply it as directed; if not, avoid anti-seize on critical brake bolts to prevent slippage or weak clamping.
Record the torque on a maintenance log so future service can compare current values to baseline readings. For professional shops, using a torque-certified calibration sheet provides traceability for audits and safety inspections.
Step-by-Step: Inspecting, Cleaning and Torquing Caliper Bolts
- Inspect bolts for wear or damage; replace any nicked heads or stripped threads. 2) Clean bolt holes and threads to remove corrosion or debris. 3) Apply any manufacturer-recommended lubricants or thread lockers exactly as specified. 4) Install caliper bolts and finger-tighten to seat the caliper. 5) Torque to the published specification in the correct sequence, using a torque wrench with an appropriate range. 6) Recheck after a few heat cycles (a short drive) to confirm stability and even pad contact. 7) Document the service and torque value in your maintenance log. This systematic approach minimizes failure risk and ensures consistent braking performance.
Maintenance Practices to Preserve Caliper Bolt Health
Routine brake system maintenance should prioritize bolt health. Inspect caliper mounting bolts on a regular schedule, especially after high-mileage driving or aggressive braking. Replace bolts that show signs of wear, corrosion, or damage rather than attempting a corrective tightening. Follow the manufacturer’s guidance on thread locker use and avoid edge-to-edge tightening that could misalign the caliper. Keep the caliper area clean and dry, and store spare bolts in a clean container to prevent contamination. Good maintenance reduces the chance of caliper misalignment, rotor scoring, and reduced braking efficiency.
Common Pitfalls and How to Avoid Them
Common pitfalls include using generic torque values, skipping the sequence, and neglecting post-tightening checks. Another frequent mistake is reusing old bolts that may have stretched or corroded threads, potentially leading to torque loss. Always verify torque with a calibrated wrench after initial operation and during routine maintenance. By following vehicle-specific specifications and maintaining a documented service history, you avoid most avoidable brake failures and extend caliper life.
Understanding Torque Units and Conversions
Torque is commonly expressed in Newton-meters (Nm) or foot-pounds (ft-lb). Converting between units is straightforward: 1 Nm ≈ 0.7376 ft-lb. When reading service data or performing maintenance, ensure you’re using the correct unit for the vehicle’s specification. If you encounter a spec in ft-lb and your wrench is in Nm, perform the conversion before tightening and verify with a second check using the device’s recommended unit. This understanding prevents misinterpretation of numbers and helps technicians apply the correct clamping force consistently.